Q: What are you supposed to do to complete the church dial puzzle?
A: The church dial puzzle, or "insignia puzzle" as I prefer to call it, is located around the back of the church, just past the cemetery, in Chapter 1-3. If you want a clue, then go and check the gravestones in the nearby cemetery for insignias that might correspond with those visible on the dial. You'll want to light up the ones that are present in the cemetery.
More? How about I just give you the answer: 3, 3, 3, 4, 4, 4, and 3. My pleasure.
Q: That insignia-light puzzle in the church at the end of Chapter 2-1 has me scratching my head. What is the correct sequence?
A: Here you go: Red x2, Green x3, Blue x1. Then go ahead and use the "combine" option.
Q: I'm stuck at the part with the waterfall, and the working gears and cogs, but I have no clue as to what to do. So...?
A: Look for and shoot the big crates that are suspended above the waterfall streams. There'll be three in total, and not a single one of them is especially well-hidden. Shooting the first crate down will allow you to cross over to the next walkway to drop the other two.
Q: What am I supposed to do after defeating Chief Mendez and collecting the False Eye?
A: Head back to the enormous gate which you'll have passed on your way towards the surprisingly long lift system. Use your newly-acquired False Eye on the gate's retinal scanner to gain entry and continue your quest.
Q: I'm stuck in the room with the Platinum Sword and the Gold Sword. What do I do?
A: All that is required is that you have the two swords exchange places. You might remember picking up the Platinum Sword from downstairs, and the Gold Sword from the upper level; simply mount the Gold Sword on the mount situated downstairs, and the Platinum Sword on the upstairs one. A new door will be revealed upon completing this very simply puzzle.
Q: What's the deal with the gallery puzzle that reads, "The sacrifice of six lives shall make way the true path"?
A: Easy peasy! Notice how the four pictures depict people dying in quite an unpleasant fashion? Your job is to make it so that the pictures are flipped into displaying exactly six people dying — or dead, rather.
Here's the solution for the quickest sequence: 1, 3, 2, and 4. Hit "OK" and you're good to go.
Q: I'm stuck in Chapter 3-3; is there something I must do in the Dining Room?
A: Why, yes! There is something you must do! Certain users, such as myself, were quite baffled to find that continuing on past the Dining Room and onwards from the Pantry will result in you returning to a previously explored area and, ultimately, have you going around in circles. The answer is to return to the dining room and head over to the far corner of the room which overlooks a narrow but presently-inaccessible corridor. Approaching the counter-like surface will allow you to press a switch and bring a curious little painting into view at the end of the hall. Shoot the wine bottle attached to the painting to retract the bars which were blocking access to a room with a very inviting-looking treasure chest in the center of it...
Q: What the heck is the correct "move order" for Ashley's sliding emblem puzzle in Chapter 3-4?
A: Short answer: There isn't a specific "move order", as such, you can take as long as you want and sort the tiles in whichever you like in order to piece together the complete emblem of the Salazar Family Insignia. However, if you want a quick and straightforward set of directions for completing the puzzle, simply copy the actions below:

A: It's very easy to miss the first time around, don't worry. Return to the castle's entrance hall — the very same place where you first meet Ramon Salazar for the first time on a balcony — and there will be an area of the wall directly ahead of the stairs which will allow you to insert the three Ornament pieces. Placing all three pieces will reveal a secret room and allow you to continue. [Image]
Q: I'm standing in a box-room with four pressure pads and two knight states; what am I supposed to do, then?
A: Nice and easy, this one. Have Ashley stand on any one of the four pressure pads situated in the room, then use your might to push the two statues on top of any of the three remaining pressure pads, respectively. With one final pressure pad remaining, go ahead and stand on it yourself. Doing so will mean that each and every one of the pressure pads will be depressed and 'activated', unlocking one of the previously locked doors and allowing you to continue. [Image]
Q: How do you lower the drawbridge in the Novistador hive room?
A: The solution is simple. After pulling the lever and having the drawbridge come down a small amount before getting stuck, you'll need to use your one-of-a-kind marksman skills to shoot the two metallic supports that fix the chains to the wall. [Image]
Q: So, I'm at the top of this tower, pulling a lever and trying to get some gears turning — but they won't. What the frig?
A: You'll need to destroy the three pieces of timber that have become wedged within some of the gears by shooting them. The first two timber pieces can be found at the very top of the tower, within sight when standing next to the lever; the third one can be spotting from the second-from-top floor, on the opposite side of the walkway from the ladder which is used to reach the top of this area. [Image] [Image]
Q: A locked door informs me I must "offer the sacrifice to the lion," in order to progress; where is this "sacrifice?"
A: Don't you worry yourself about all that sacrificial business right now. What you really need to do at this present moment in time is locate the hidden tunnel entrance in the nearby shack — which is not entirely too difficult at all. Simply make your way around to the back of the shack — designated in the image below — to find a crank which will reveal the entrance to the secret tunnel. [Image]
Q: I'm stuck in the military outpost at the start of Chapter 5-1. How do I get that blasted door open and what's up with that frickin' laser?
A: You'll be needing to redirect that laser back to its source in order to open that large stone door. Make your way over to the roof of the building situated just a short distance from the front of the steps and tinker with the mirror so that it reflects the laser over to the mirror to your right, also on the roof of a nearby building. Upon doing so, make your way over to that second mirror and twirl it so that it aims the laser straight the way back to the panel next to the exit door. If you have both of the mirrors aligned properly, you should now be free to move onto the next area.
Q: So, I'm in the autopsy room of Chapter 5-1, near the booth with the incapacitated Regenerator; what on Earth is the solution to that bizarre terminal puzzle?
A: Ah, that one. I won't even begin to hypothesize why on Earth it is that the facility's management decided to install easy-to-complete puzzles instead of staff-only key codes. Anyhoo, hit the following 'colours' in this order to unlock the security door: 'Red' x3, 'Green' x2, 'Blue' x1. And that's it.
A: The church dial puzzle, or "insignia puzzle" as I prefer to call it, is located around the back of the church, just past the cemetery, in Chapter 1-3. If you want a clue, then go and check the gravestones in the nearby cemetery for insignias that might correspond with those visible on the dial. You'll want to light up the ones that are present in the cemetery.
More? How about I just give you the answer: 3, 3, 3, 4, 4, 4, and 3. My pleasure.
Q: That insignia-light puzzle in the church at the end of Chapter 2-1 has me scratching my head. What is the correct sequence?
A: Here you go: Red x2, Green x3, Blue x1. Then go ahead and use the "combine" option.
Q: I'm stuck at the part with the waterfall, and the working gears and cogs, but I have no clue as to what to do. So...?
A: Look for and shoot the big crates that are suspended above the waterfall streams. There'll be three in total, and not a single one of them is especially well-hidden. Shooting the first crate down will allow you to cross over to the next walkway to drop the other two.
Q: What am I supposed to do after defeating Chief Mendez and collecting the False Eye?
A: Head back to the enormous gate which you'll have passed on your way towards the surprisingly long lift system. Use your newly-acquired False Eye on the gate's retinal scanner to gain entry and continue your quest.
Q: I'm stuck in the room with the Platinum Sword and the Gold Sword. What do I do?
A: All that is required is that you have the two swords exchange places. You might remember picking up the Platinum Sword from downstairs, and the Gold Sword from the upper level; simply mount the Gold Sword on the mount situated downstairs, and the Platinum Sword on the upstairs one. A new door will be revealed upon completing this very simply puzzle.
Q: What's the deal with the gallery puzzle that reads, "The sacrifice of six lives shall make way the true path"?
A: Easy peasy! Notice how the four pictures depict people dying in quite an unpleasant fashion? Your job is to make it so that the pictures are flipped into displaying exactly six people dying — or dead, rather.
Here's the solution for the quickest sequence: 1, 3, 2, and 4. Hit "OK" and you're good to go.
Q: I'm stuck in Chapter 3-3; is there something I must do in the Dining Room?
A: Why, yes! There is something you must do! Certain users, such as myself, were quite baffled to find that continuing on past the Dining Room and onwards from the Pantry will result in you returning to a previously explored area and, ultimately, have you going around in circles. The answer is to return to the dining room and head over to the far corner of the room which overlooks a narrow but presently-inaccessible corridor. Approaching the counter-like surface will allow you to press a switch and bring a curious little painting into view at the end of the hall. Shoot the wine bottle attached to the painting to retract the bars which were blocking access to a room with a very inviting-looking treasure chest in the center of it...
Q: What the heck is the correct "move order" for Ashley's sliding emblem puzzle in Chapter 3-4?
A: Short answer: There isn't a specific "move order", as such, you can take as long as you want and sort the tiles in whichever you like in order to piece together the complete emblem of the Salazar Family Insignia. However, if you want a quick and straightforward set of directions for completing the puzzle, simply copy the actions below:
- Tile #6
- Tile #3
- Tile #2
- Tile #5
- Tile #4
- Tile #7
- Tile #8
- Tile #9
- Tile #6
- Tile #5
- Tile #2
- Tile #1
- Tile #4
- Tile #7
- Tile #8
- Tile #5
- Tile #6
- Insert missing emblem piece
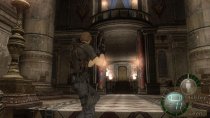
A: It's very easy to miss the first time around, don't worry. Return to the castle's entrance hall — the very same place where you first meet Ramon Salazar for the first time on a balcony — and there will be an area of the wall directly ahead of the stairs which will allow you to insert the three Ornament pieces. Placing all three pieces will reveal a secret room and allow you to continue. [Image]
Q: I'm standing in a box-room with four pressure pads and two knight states; what am I supposed to do, then?
A: Nice and easy, this one. Have Ashley stand on any one of the four pressure pads situated in the room, then use your might to push the two statues on top of any of the three remaining pressure pads, respectively. With one final pressure pad remaining, go ahead and stand on it yourself. Doing so will mean that each and every one of the pressure pads will be depressed and 'activated', unlocking one of the previously locked doors and allowing you to continue. [Image]
Q: How do you lower the drawbridge in the Novistador hive room?
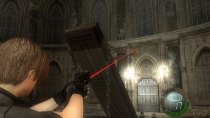
A: The solution is simple. After pulling the lever and having the drawbridge come down a small amount before getting stuck, you'll need to use your one-of-a-kind marksman skills to shoot the two metallic supports that fix the chains to the wall. [Image]
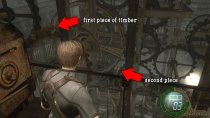
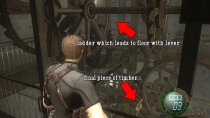
Q: So, I'm at the top of this tower, pulling a lever and trying to get some gears turning — but they won't. What the frig?
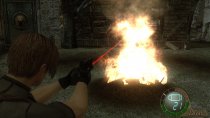
A: You'll need to destroy the three pieces of timber that have become wedged within some of the gears by shooting them. The first two timber pieces can be found at the very top of the tower, within sight when standing next to the lever; the third one can be spotting from the second-from-top floor, on the opposite side of the walkway from the ladder which is used to reach the top of this area. [Image] [Image]
Q: A locked door informs me I must "offer the sacrifice to the lion," in order to progress; where is this "sacrifice?"
A: Don't you worry yourself about all that sacrificial business right now. What you really need to do at this present moment in time is locate the hidden tunnel entrance in the nearby shack — which is not entirely too difficult at all. Simply make your way around to the back of the shack — designated in the image below — to find a crank which will reveal the entrance to the secret tunnel. [Image]
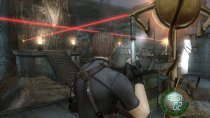
Q: I'm stuck in the military outpost at the start of Chapter 5-1. How do I get that blasted door open and what's up with that frickin' laser?
A: You'll be needing to redirect that laser back to its source in order to open that large stone door. Make your way over to the roof of the building situated just a short distance from the front of the steps and tinker with the mirror so that it reflects the laser over to the mirror to your right, also on the roof of a nearby building. Upon doing so, make your way over to that second mirror and twirl it so that it aims the laser straight the way back to the panel next to the exit door. If you have both of the mirrors aligned properly, you should now be free to move onto the next area.
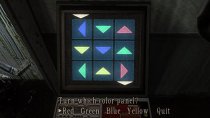
Q: So, I'm in the autopsy room of Chapter 5-1, near the booth with the incapacitated Regenerator; what on Earth is the solution to that bizarre terminal puzzle?
A: Ah, that one. I won't even begin to hypothesize why on Earth it is that the facility's management decided to install easy-to-complete puzzles instead of staff-only key codes. Anyhoo, hit the following 'colours' in this order to unlock the security door: 'Red' x3, 'Green' x2, 'Blue' x1. And that's it.
Attachments
-
 autopsy-room-puzzle.jpg145.9 KB · Views: 4
 -
 crank-puzzle-1.jpg174.7 KB · Views: 7
 -
 crank-puzzle-2.jpg182.4 KB · Views: 6
 -
 mirror-laser-puzzle.jpg195.5 KB · Views: 6
 -
 resident-evil-4-castle-hall.jpg31.3 KB · Views: 3
 -
 Resident-Evil-4-drawbridge.jpg29.8 KB · Views: 5
 -
 Resident-Evil-4-offer-the-sacrifice-to-the-lion.jpg261 KB · Views: 5
 -
 statue-pressure-pad-puzzle.jpg222.6 KB · Views: 7
Last edited: